Tally Prime 7.0 Masterclass: Split Tally Data, Voucher Prefix, Financial Year, and More
Tally Prime 7.0 has become the backbone of accounting for millions of businesses across India and beyond. Split Tally Data, Voucher Prefix, Financial Year Whether you are a seasoned accountant, a business owner managing your own books, or a student learning the ropes, mastering the advanced features of Tally Prime can save you countless hours and prevent costly errors.
In this comprehensive guide, we will explore seven critical aspects of Tally Prime 7.0 that every user must understand. From splitting bloated company data to understanding the crucial difference between renumbering and retaining original voucher numbers, this article covers it all. We will also walk through the correct way to create a sales invoice, how to set up a voucher number prefix, change the financial year, implement zero opening, and utilize the powerful multi-alteration feature.
Let’s dive in and unlock the full potential of Tally Prime 7.0.
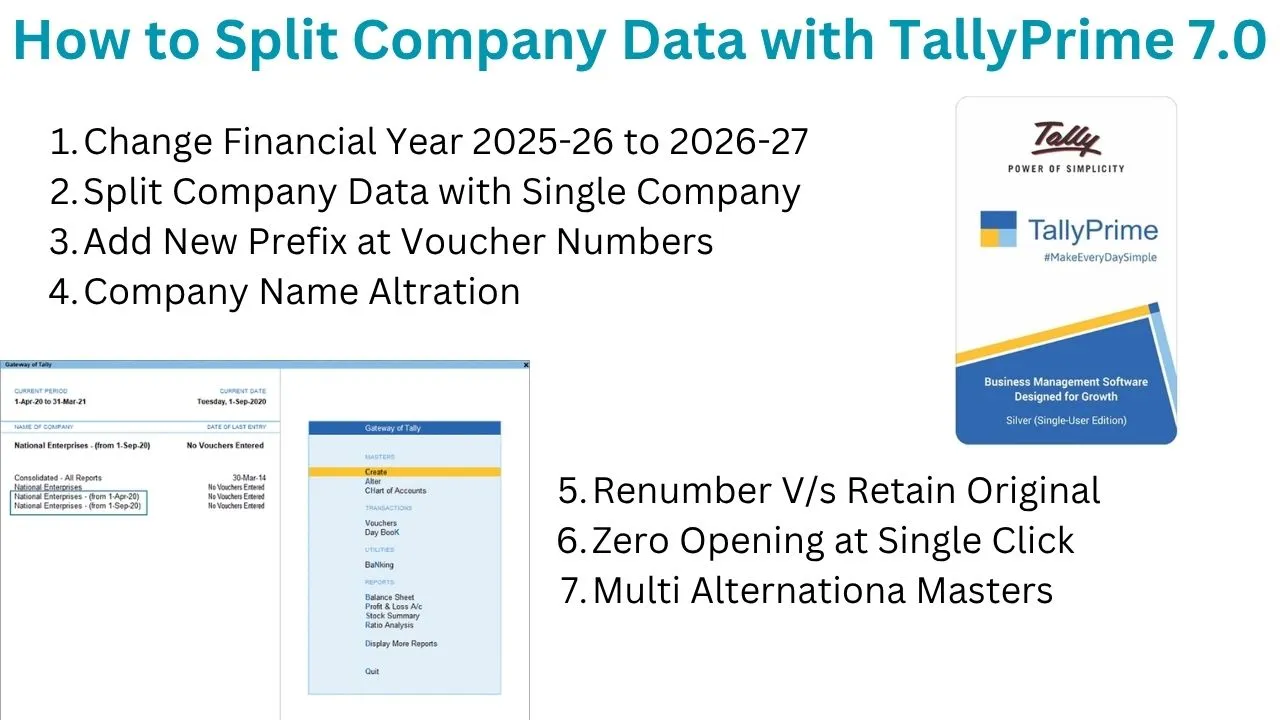
1. Split Tally Data 7.0: Streamlining Your Accounting Database
One of the most common issues faced by Tally users is a bloated company data file. As years pass and transactions accumulate, the company file grows exponentially. This can lead to slow performance, delayed report generation, and even occasional software crashes. The solution? Splitting your company data.
What Does Splitting Company Data Mean?
Splitting company data in Tally Prime 7.0 refers to the process of dividing a single company’s data into two separate companies based on a specific cutoff date. All transactions up to that date are moved to a new “archive” company, while the original company retains transactions after that date.
Why Should You Split Tally Data?
- Improved Performance: A smaller data file loads faster and processes reports more quickly.
- Better Organization: Historical data is safely archived, making current year data cleaner and easier to manage.
- Simplified Backup: Smaller files mean faster backups and easier restoration if needed.
- Statutory Compliance: Starting a new financial year with a fresh file helps in accurate GST and TDS reporting without legacy clutter.
Step-by-Step Process to Split Tally Data
- Take a Backup: Before performing any split operation, always take a complete backup of your company data. This is your safety net.
- Open Tally Prime 7.0: Navigate to the company you wish to split.
- Access Company Split Option: Go to
Company Info>Split Company Data. - Select Cutoff Date: You will be prompted to enter a date. All transactions on or before this date will be moved to the new archive company. For example, if you want to archive data up to March 31, 2025, set that as the cutoff date.
- Name the Archive Company: Tally will ask you to provide a name for the new company that will hold the archived data. Choose a descriptive name like “MyCompany_Archive_2025”.
- Execute the Split: Confirm your settings. Tally will process the split and create two separate company files.
What Happens After Splitting (Split Tally Data)?
- The original company will contain all masters (ledgers, stock items, groups) but only transactions after the cutoff date. Opening balances are automatically adjusted to reflect the closing balance of the archived period.
- The new archive company will contain all transactions up to the cutoff date, allowing you to view historical reports whenever needed.
Important Consideration: Once split, the two companies operate independently. If you frequently need to view consolidated reports across multiple years, consider whether splitting is the right choice, or alternatively, use the “Company Data Export/Import” features for selective data management.
2. Voucher Number Prefix: Customizing Your Voucher Series
In professional accounting, having a well-organized voucher numbering system is essential. It not only looks professional but also makes auditing and tracking much easier. Tally Prime 7.0 allows you to add prefixes to your voucher numbers through advanced configuration.
What is a Voucher Number Prefix?
A voucher number prefix is a set of characters (letters, numbers, or symbols) that appear before the sequential voucher number. For example, instead of simply “1”, your sales invoice could be numbered INV/23-24/1. This instantly tells you that the voucher is a sales invoice from the financial year 2023-24.
Why Use a Voucher Number Prefix?
- Easy Identification: Instantly distinguish between voucher types without opening them.
- Financial Year Segregation: Automatically embed the financial year in the voucher number.
- Professional Presentation: Clients and auditors appreciate well-structured, meaningful invoice numbers.
- Prevent Duplication: When multiple users are entering vouchers, prefixes help maintain a clean series.
How to Set Up Voucher Number Prefix in Tally Prime 7.0
- Go to Voucher Type: Navigate to
Gateway of Tally>Accounts Info>Voucher Types>Alter. - Select Voucher Type: Choose the voucher you want to modify, such as “Sales” or “Payment”.
- Enable Advanced Configuration: In the voucher type alteration screen, set
Use Advanced ConfigurationtoYes. - Define the Numbering Method: You will see options like
Numbering MethodandPrefix.- Prefix: Enter the text you want before the number. You can use static text like “INV/” or dynamic values like
[FY]for financial year. - Start From: Define the starting number for the series.
- Width: Set the number of digits (e.g., width 4 will display 0001).
- Prefix: Enter the text you want before the number. You can use static text like “INV/” or dynamic values like
- Save: Press
Ctrl + Ato save your changes.
Dynamic Prefix Options
Tally Prime 7.0 offers powerful dynamic prefixes. You can use:
[FY]: Inserts the current financial year (e.g., 2425)[Date]: Inserts the voucher date[Company]: Inserts the company name abbreviation
Example Configuration: Prefix: INV/[FY]/ with Start From: 1 and Width: 4 will generate numbers like INV/2425/0001.
3. Change Financial Year: Starting Fresh or Correcting Errors
Changing the financial year in Tally Prime 7.0 is a routine task at the beginning of a new fiscal year. However, it must be done correctly to maintain accurate books.
The Correct Way to Change Financial Year
Many users mistakenly change the system date or create a new company from scratch. The correct method is to alter the company’s “Books Beginning From” date.
- Go to Company Alteration: From the
Gateway of Tally, pressF3(Company Info) or go toCompany Info>Alter. - Select Your Company: Choose the company you wish to modify.
- Modify Books Beginning From: In the company alteration screen, you will see the field
Books Beginning From. Change this to the start date of your new financial year (e.g., April 1, 2025). - Save: Press
Ctrl + Ato save.
What Happens When You Change the Financial Year?
- Tally automatically locks the previous year’s transactions, preventing accidental modifications.
- Opening balances for the new year are carried forward from the closing balances of the previous year.
- You can still view and print reports for the previous year by changing the reporting period.
Common Mistakes to Avoid
- Do Not Change System Date: Changing your computer’s system date does not change the company’s financial year. It only creates confusion and data inconsistency.
- Do Not Use “Zero Opening” Unless Intended: Changing the financial year does not automatically zero out balances. If you want to start fresh with zero balances, you need a separate process (covered later).
- Backup Before Changing: Always take a backup before altering the financial year, especially if you are changing it mid-year to correct an initial setup error.
4. Difference Between Renumber and Retain Original Voucher Number
This is arguably one of the most misunderstood features in Tally. When you perform certain operations like sorting vouchers, importing data, or altering voucher lists, Tally Prime 7.0 asks whether you want to Renumber vouchers or Retain Original voucher numbers. Understanding this distinction is critical for data integrity.
What Does “Renumber” Do?
When you choose to renumber vouchers, Tally Prime 7.0 rearranges all vouchers in chronological order (based on the voucher date) and assigns them a fresh, sequential numbering series starting from 1.
When to Use Renumber:
- After importing data from another software where voucher numbers are inconsistent or out of sequence.
- When you have a new company with no physical documentation tied to specific voucher numbers.
- When you want a clean, unbroken sequential series for all vouchers.
Risks of Renumbering:
- If you have already printed physical invoices with specific numbers, renumbering will create a mismatch. Your physical invoice #101 might become digital voucher #001.
- This mismatch can cause serious issues during audits or GST reconciliation.
What Does “Retain Original Voucher Number” Do?
Choosing to retain original numbers keeps the voucher numbers exactly as they were originally entered. Even if you sort the vouchers by date, the numbers remain unchanged.
When to Use Retain Original:
- Always choose this option if you are dealing with statutory compliance like GST, TDS, or if you have issued physical invoices to customers.
- When you have a well-established numbering system that you do not want to disrupt.
- During year-end processes where previous year vouchers should remain locked with their original numbers.
Practical Scenario
Imagine you have 100 sales invoices that you have already printed and shared with customers, numbered 1 through 100. Later, you realize that vouchers 50 and 60 were entered out of date order. If you choose Renumber, Tally will re-sequence all vouchers by date, and your printed invoice #50 might now be assigned a different number. Your physical records will no longer match the digital records.
If you choose Retain Original, the numbers stay as they are, preserving the integrity of your documentation.
Pro Tip: When in doubt, choose Retain Original. You can always renumber later if needed, but once renumbered, reversing the process is difficult without restoring a backup.
5. Right Way for Sales Invoice: Accuracy and Compliance
Creating a sales invoice in Tally Prime 7.0 might seem straightforward, but there is a “right way” that ensures GST compliance, accurate inventory tracking, and professional presentation.
Ledger-Based vs. Inventory-Based Invoicing
There are two approaches to creating sales invoices:
| Approach | Method | Best For |
|---|---|---|
| Ledger-Based | Credit a single “Sales” ledger | Service businesses, non-inventory sales |
| Inventory-Based | Use Stock Items with individual rates and quantities | Trading and manufacturing businesses requiring stock management |
The right way for most businesses is the inventory-based approach because it provides detailed tracking of stock, cost of goods sold, and profit margins.
Step-by-Step: Creating a Correct Sales Invoice
- Set Up GST Details: Ensure your company has GST enabled (
F11>Features>Enable Goods and Services Tax (GST)). - Configure Party Ledgers: Each customer ledger must have the correct GST registration type (Regular, Composition, etc.) and GSTIN.
- Configure Stock Items: Each stock item should have the appropriate HSN/SAC code and GST rate (e.g., 5%, 12%, 18%, 28%).
- Enter Sales Invoice:
- Go to
Gateway of Tally>Vouchers>F8: Sales. - Select the Party (customer).
- Select the Supply Type (Intra-state if same state, Inter-state if different state).
- Add Stock Items with quantities and rates.
- Verify that the GST automatically populates based on the item and party.
- Go to
- Verify Tax Details: Check the tax analysis to ensure CGST/SGST or IGST is correctly applied.
- Save: Press
Ctrl + Ato save.
Common Mistakes to Avoid
- Incorrect Supply Type: Selecting “Intra-state” when the customer is in another state leads to incorrect GST calculation. Always verify the party’s state.
- Missing HSN/SAC: Every stock item must have an HSN (for goods) or SAC (for services) code for GST reporting.
- Using Sales Ledger Instead of Stock Items: If you credit a single “Sales” ledger without entering stock items, you lose inventory tracking and profitability analysis per product.
6. Zero Opening: Starting Fresh with Nil Balances
The Zero Opening feature in Tally Prime 7.0 is a powerful tool when you want to start a new company or a new financial year with all ledgers having a nil balance.
What is Zero Opening?
Zero opening is the process of resetting all ledger balances to zero. It does not delete masters (ledgers, groups, stock items), but it clears all opening balance figures.
When to Use Zero Opening
- New Business: When setting up a company for a brand-new business with no prior financial history.
- After Data Archiving: After splitting company data, you may want the current company to start with only current year transactions and zero opening balances.
- Fresh Start: When you want to begin a new financial year without carrying forward previous year balances (though this is less common, as most businesses need opening balances).
How to Perform Zero Opening
- Backup Your Data: Always take a backup before performing zero opening, as this action cannot be undone easily.
- Go to Company Alteration:
Company Info>Alter. - Select Your Company: Choose the company you want to modify.
- Enable Zero Opening: In the company alteration screen, set
Zero OpeningtoYes. - Save and Restart: Press
Ctrl + Ato save. Tally will prompt you to restart the company for changes to take effect. - Enter New Opening Balances: After restarting, you can manually enter opening balances for relevant ledgers (like bank accounts, loans, capital) using the
Display>Account Books>Opening Balancescreen.
Important Note
Zero opening does not delete any vouchers. If your company already has transactions, performing zero opening will not remove those vouchers. It only affects the opening balance fields of ledgers. For a completely fresh company with no transactions, zero opening is the perfect starting point.
7. Multi Alteration: Editing Multiple Masters Simultaneously
Editing ledgers, stock items, or vouchers one by one is tedious and time-consuming. Tally Prime 7.0 offers a powerful feature called Multi Alteration that allows you to edit multiple masters in bulk.
What is Multi Alteration?
Multi alteration is a feature that lets you select multiple ledgers, stock items, or even vouchers and modify common fields across all of them simultaneously. This is a massive time-saver for accountants managing large databases.
Types of Multi Alteration
- Multi Alteration of Ledgers: Modify groups, GST registration types, mailing details, or opening balances for multiple ledgers at once.
- Multi Alteration of Stock Items: Change units, rates, HSN codes, or GST rates for multiple stock items in bulk.
- Multi Alteration of Vouchers: Change voucher dates, voucher numbers, or cost center allocations across a range of vouchers.
Step-by-Step: Multi Alteration of Ledgers
- Navigate to Ledger List:
Gateway of Tally>Display>List of Accounts>Ledgers. - Enter Multi Alteration Mode: Press
F5: Multi Alter. You will see a list of all ledgers with editable fields. - Select Fields to Edit: Tally will ask which fields you want to display for editing. Choose fields like
Group,GST Registration Type,Mailing Details, etc. - Make Bulk Changes: You can now navigate through the list and make changes to multiple ledgers quickly. Use
Enterto move from one field to another. - Save: Press
Ctrl + Ato save all changes simultaneously.
Advanced Multi Alteration Using Excel (Export/Import)
For even more power, Tally Prime 7.0 allows you to export data to Excel, make bulk changes, and import it back.
- Export Data: From any list (ledgers, stock items), press
Alt + Eto export to Excel. - Edit in Excel: Open the exported file, make your changes using Excel’s powerful editing tools (find/replace, formulas, etc.).
- Import Back: Go to
Display>List of Accounts>Ledgers, pressAlt + Ito import the modified Excel file. Tally will update the masters based on your changes.
Use Cases for Multi Alteration
- GST Rate Changes: When the government changes GST rates, use multi alteration to update rates for hundreds of stock items in minutes.
- Group Reclassification: Move multiple ledgers from one group to another (e.g., all “Sundry Debtors” from “Current Assets” to a custom group).
- Address Updates: Update mailing addresses or GSTINs for dozens of parties at once.
Best Practices for Tally Prime 7.0 Data Management
To ensure your Tally Prime 7.0 experience is smooth and error-free, follow these best practices:
1. Regular Backups
Always maintain regular backups. Set a schedule—daily, weekly, or monthly—depending on your transaction volume. Store backups in multiple locations (local drive, cloud, external drive).
2. Use Company Features Wisely
Understand the difference between F11 (Company Features) and F12 (Configuration). F11 deals with company-specific accounting features, while F12 affects user interface and operational preferences.
3. Maintain Data Integrity
When choosing between “Renumber” and “Retain Original,” always consider your statutory and documentation requirements. When in doubt, retain original numbers.
4. Document Your Configuration
Keep a record of your voucher numbering configurations, GST settings, and other customizations. This helps in troubleshooting and when training new users.
5. Stay Updated
Tally Solutions regularly releases updates and patches. Keep your Tally Prime 7.0 installation updated to benefit from bug fixes and new features.
Common Issues and Troubleshooting
Issue 1: Company Data File is Too Large
Solution: Use the “Split Company Data” feature as described in Section 1. Archive old data and continue with a fresh, lightweight company file.
Issue 2: Voucher Numbers Are Out of Sequence
Solution: If you have no physical documentation constraints, use the “Renumber” option. If you have printed invoices, manually correct the sequence or restore from backup.
Issue 3: GST Not Appearing in Sales Invoice
Solution: Verify that:
- GST is enabled in company features.
- The party ledger has the correct GST registration type and GSTIN.
- The stock item has the correct HSN and GST rate.
Issue 4: Unable to Change Financial Year
Solution: Ensure you are altering the company (F3 > Alter) and changing the “Books Beginning From” date. If the field is greyed out, you may have transactions that need to be closed or archived first.
Conclusion
Mastering Tally Prime 7.0 data management is essential for any accounting professional or business owner. The features we’ve covered—splitting company data, configuring voucher number prefixes, changing the financial year, understanding the renumber vs. retain distinction, creating compliant sales invoices, using zero opening, and leveraging multi alteration—form the foundation of efficient and accurate accounting.
By implementing these practices, you can ensure your Tally Prime 7.0 environment runs smoothly, your data remains accurate, and you stay compliant with statutory requirements like GST. Take the time to understand each feature, experiment in a test environment if possible, and always maintain regular backups.
Frequently Asked Questions (FAQs)
Q1: Can I undo a company split?
No, the split operation is permanent. However, you can still access the archived data in the new company. Always keep a backup before splitting.
Q2: Will changing the financial year affect my previous year reports?
No. Previous year reports remain accessible. Simply change the reporting period using F2 (Period) to view historical data.
Q3: Is it safe to use multi alteration on vouchers?
Yes, but with caution. Multi alteration of vouchers can impact large sets of data. Always take a backup before performing bulk voucher alterations.
Q4: What happens to stock items after zero opening?
Stock items remain, but their opening balances are set to zero. You will need to re-enter opening stock quantities and values if applicable.
Q5: Can I have different voucher number prefixes for different financial years?
Yes. You can alter the voucher type configuration at the start of each financial year to update the prefix (e.g., change from [FY] or manually update the static prefix).
Fore More Details You Can Connect with us